Wednesday, 16 January 2019

Oracle 12c Rac setup for Node 1(chapter 2)

In this post, we will create our first virtual m/c which will use in RAC node 1
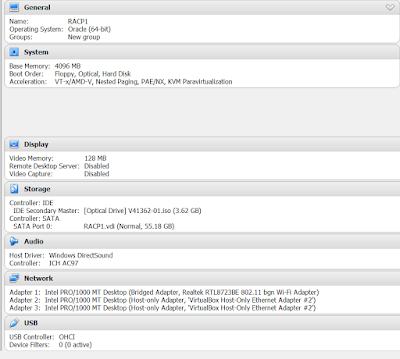
Create new Machine In Virtual Box with settings as below: and IP Adress

RAM: 4G or above
3 Network adapters: 1 Bridged and 2 Host Only Adapters
HardDisk: 50 GB

IP address :

I am using eth1 and eth2 as my host only adapters that will be used for public and private IP's .
eth0 I am using as bridged adapter to access the internet .I will set up static IP for eth1 and eth2

eth1:(Public IP)

192.168.56.10
255.255.255.0
255.255.255.o 

eth2:(Private IP)
10.10.0.10
8
10.10.0.1

and select connect automatically for eth0,eth1 and eth2.

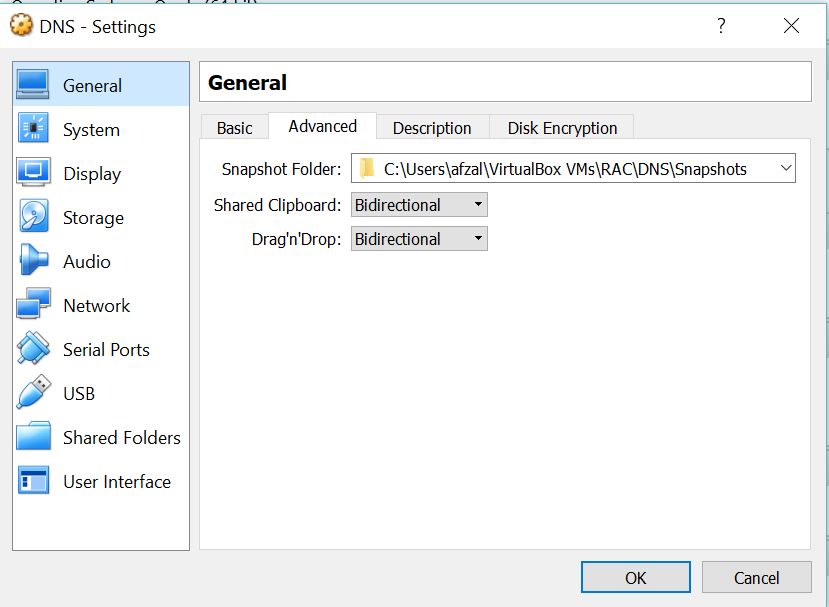
1-select Bidirectional on general setting and other setting is available in pics


create custom layout 

/swap-->4GB
/tmp--->4GB
/boot--->500MB
/root-->remaining space 


select software option:                                                                     


Machine has been prepared for RACNODE2

===============================================================

DNS Config
Now let's configure the system so that it will go to our DNS server that we created earlier.
Make sure DNS server is up and running.

Login to DNS server and go to /var/named and put IP entries in zone file for our RAC Ip's.


Restart DNS service 

service named restart


[root@himvirtualdns Desktop]# cd /var/named/

[root@himvirtualdns named]# ls

56.168.192.in-addr.arpa  himvirtualdns.lab.zone  named.localhost
data                     named.ca                named.loopback
dynamic                  named.empty             slaves
[root@himvirtualdns named]# cat himvirtualdns.lab.zone 
$TTL    86400
@               IN SOA  localhost root.localhost (
                                        42              ; serial (d. adams)
                                        3H              ; refresh
                                        15M             ; retry
                                        1W              ; expiry
                                        1D )            ; minimum
                IN NS           localhost
               
localhost       IN A            127.0.0.1
himvirtualdns   IN A    192.168.56.101
himvirtualdns   IN A  192.168.56.101
racnode1        IN A  192.168.56.10
racnode2        IN A  192.168.56.11
racnode1-priv   IN A  10.10.0.10
racnode2-priv   IN A  10.10.0.11
racnode1-vip    IN A  192.168.56.111
racnode2-vip    IN A  192.168.56.112
racdb-scan     IN A   192.168.56.121
racdb-scan     IN A   192.168.56.122
racdb-scan     IN A   192.168.56.123


Login to RACNode1 and edit /etc/resolv.conf. It should have below entiries

cat /etc/resolv.conf
# Generated by NetworkManager
search himvirtualdns.lab
nameserver 192.168.56.101

Permission change
chattr +i resolv.conf

Now run nslookup from racnode1 to verify it is routing to DNS server.

Before the check nslookup we should Disable the "Firewall"

[oracle@racnode1 bin]$ nslookup racnode1

======================================================================


High level steps --12C RAC Steps On Oracle Vitual Box with OEL

IP's Addrees that i will use


Wednesday, 18 July 2018

Setup DNS server on OEL/Linux

In this post, I am going to share the steps for setup of DNS server. It will be used in my for RAC 12c setup.

Pre-req:

Virtual Box is installed and a Machine is prepared. Below is the configuration of the machine.

Virtual DNS OS Configuration:
RAM: 1GB
HardDisk Size : 12 GB

Operating System: Oracle Enterprise Linux

The installation of the Server would be a basic installation with Option selected as Software Development Workstation to get a GUI. Once the OS installation is done you can optionally install Guest Addition as it helps for easy mouse movements and sharing a file from host system to this guest virtual system.

IPADDR=192.168.56.101
GATEWAY=255.255.255.0
NETMASK=255.255.255.0


High level Steps to configure DNS Server.

  • ·         Install DNS Package
  • ·         Assign static IP to the server
  • ·         Assign FQDN(Fully Qualified Domain Name) for server
  • ·         Configure /etc/hosts
  • ·         Configure /etc/resolv.conf        
  • ·         Configure /etc/named.conf
  • ·         Configure Forward and reverse zone
  • ·         Change the group ownership  of Forward and reverse zone file
  • ·         Restart DNS Server.
  • ·         Change permission of the resolv.conf

1- Installation of the DNS server (BIND)

 From the command line issue the following command.
         # yum install bind-libs bind bind-utils


   2-Assign static IP

     
cd /etc/sysconfig/network-scripts
I am using my adapter 2 so I have changed the entry in eth1.
Change ifcfg-eth1 file and add below entry
  
cd /etc/sysconfig/network-scripts
vi ifcfg-eth1

BOOTPROTO=static
IPADDR=192.168.56.101
GATEWAY=255.255.255.0
NETMASK=255.255.255.0

 3-Assign FQDN for server

  Add any fully qualified name which you want to give.  

 vi /etc/sysconfig/network
 NETWORKING=yes
 HOSTNAME=path.labs

4-Change /etc/resolv.conf


Change /etc/resolv.conf and also change it permission so that it will be not overwritten once server is restarted.
This resolv.conf entry has to be made on all the client systems as well.

[root@path network-scripts]# cat /etc/resolv.conf
# Generated by NetworkManager
search path.labs
nameserver 192.168.56.101

Permission change
chattr +i resolv.conf

5-Change /etc/named.conf  File
    
Edit the contents of the "/etc/named.conf" file. Depending on the setup you require, you may need to make lots of changes, or none at all. For my home network I use "path.lab" as my domain and the IP range "192.168.56.*", so this is what I will show here.
We are adding both forward and reserve lookup

I will show lines which needs to be updated 

listen-on port 53 { 127.0.0.1;192.168.56.101; };
allow-query     { any; };

and I will show lines which needs to be add

zone "path.labs" IN {
        type master;
        file "path.labs.zone";
        allow-update { none; };
};

zone "56.168.192.in-addr.arpa." IN {
        type master;
        file "56.168.192.in-addr.arpa";
        allow-update { none; };
};


    6-Create Forward and Reverse zone files

     Create forward and reverse lookup file

cd  /var/named  touch      56.168.192.in-addr.arpa       path.labs.zone

Add below entry in respective files.

[root@path named]# cat path.labs.zone

$TTL    86400
@               IN SOA  localhost root.localhost (
                                        42              ; serial (d. adams)
                                        3H              ; refresh
                                        15M             ; retry
                                        1W              ; expiry
                                        1D )            ; minimum
                IN NS           localhost
localhost       IN A            127.0.0.1
path   IN A    192.168.56.101


root@path named]# cat 56.168.192.in-addr.arpa


$ORIGIN 56.168.192.in-addr.arpa.
$TTL 1H
@       IN      SOA     path.labs.     root.path.labs. (      2
                                                3H
                                                1H
                                                1W
                                                1H )
56.168.192.in-addr.arpa.         IN NS      path.labs.
101     IN PTR  path.labs.

 7-Change Ownership of the forward and reverse file.

cd /var/named
chown named:named 56.168.192.in-addr.arpa path.labs.zone

    8-To Make sure Bind is started every time server is   restarted.

chkconfig named on
Restart named
service named restart

9-Check if DNS is working fine

[root@path named]# nslookup path
Server:             192.168.56.101
Address:          192.168.56.101#53

Name:  path.path.labs
Address: 192.168.56.101

[root@path named]# nslookup 192.168.56.101
Server:             192.168.56.101
Address:          192.168.56.101#53

101.56.168.192.in-addr.arpa      name = path.labs.


Thursday, 30 April 2015

Oracle tablespace management

Below query to find out possible savings from each data files of Database

set verify off
column file_name format a50 word_wrapped
column smallest format 999,990 heading "Smallest|Size|Poss."
column currsize format 999,990 heading "Current|Size"
column savings  format 999,990 heading "Poss.|Savings"
break on report
compute sum of savings on report
column value new_val blksize
select value from v$parameter where name = 'db_block_size';
/
select file_name,
       ceil( (nvl(hwm,1)*&&blksize)/1024/1024 ) smallest,
       ceil( blocks*&&blksize/1024/1024) currsize,
       ceil( blocks*&&blksize/1024/1024) -
       ceil( (nvl(hwm,1)*&&blksize)/1024/1024 ) savings
from dba_data_files a,
     ( select file_id, max(block_id+blocks-1) hwm
         from dba_extents
        group by file_id ) b
where a.file_id = b.file_id(+) order by savings desc
/

Script from notes to generate the queries to resize the data files:

select 'alter database datafile'||' '''||file_name||''''||' resize '||round(highwater+2)||' '||'m'||';' from (
select /*+ rule */
   a.tablespace_name,
    a.file_name,
   a.bytes/1024/1024 file_size_MB,
    (b.maximum+c.blocks-1)*d.db_block_size/1024/1024 highwater
from dba_data_files a        ,
     (select file_id,max(block_id) maximum         
      from dba_extents         
      group by file_id) b,
      dba_extents c,
     (select value db_block_size         
      from v$parameter         
      where name='db_block_size') d
where a.file_id=  b.file_id
and   c.file_id  = b.file_id
and   c.block_id = b.maximum
order by a.tablespace_name,a.file_name);

Monday, 10 March 2014

Aix Tar command

1-  tar cvf - rman | gzip > rman.tar.gz

2- gunzip < rman.tar.gz | tar xvf -

3-  tar cvf - rman | gzip > /d01/oracle/abc.tar.gz

4- gunzip < /d01/rman.tar.gz | tar xvf -

5- tar cvf  /d01/rman.tar  rman

6- tar cvf rman.tar

clean lock session

find locked session

SELECT SID, serial, seconds_in_wait,
        oracle_username, os_user_name, object_name object_locked,locked_mode
      FROM   (SELECT   sess.SID, sess.serial# serial, lo.oracle_username,
                       lo.os_user_name, ao.object_name, lo.locked_mode,
                       sess.seconds_in_wait
                  FROM v$locked_object lo, dba_objects ao, v$session sess
                 WHERE ao.object_id = lo.object_id
                       AND lo.session_id = sess.SID
              ORDER BY seconds_in_wait DESC)


clean lock session

DECLARE
   v_sid                           NUMBER;
   v_serial                        NUMBER;
   v_seconds_in_wait               NUMBER;
   v_stmt                          VARCHAR2 (500);
   v_lock_time_wait_sec   CONSTANT NUMBER (3)     := 100;

   CURSOR c_data
   IS
      SELECT SID, serial, seconds_in_wait
        /*oracle_username, os_user_name, object_name object_locked,locked_mode, seconds_in_wait*/
      FROM   (SELECT   sess.SID, sess.serial# serial, lo.oracle_username,
                       lo.os_user_name, ao.object_name, lo.locked_mode,
                       sess.seconds_in_wait
                  FROM v$locked_object lo, dba_objects ao, v$session sess
                 WHERE ao.object_id = lo.object_id
                       AND lo.session_id = sess.SID
              ORDER BY seconds_in_wait DESC)
       WHERE ROWNUM <= 5;
BEGIN
   FOR xx IN c_data
   LOOP
      DBMS_LOCK.sleep (1);

      BEGIN
         v_stmt :=
               'alter system kill session '
            || CHR (39)
            || xx.SID
            || ','
            || xx.serial
            || CHR (39);

         IF xx.seconds_in_wait > v_lock_time_wait_sec
         THEN
            EXECUTE IMMEDIATE v_stmt;
         END IF;
      EXCEPTION
         WHEN OTHERS
         THEN
            NULL;
      END;
   END LOOP;
EXCEPTION
   WHEN NO_DATA_FOUND
   THEN
      NULL;
   WHEN OTHERS
   THEN
      raise_application_error (-20001, SQLERRM);
END;